Textual Query Sandbox Update

Posted on 2023-09-10 09:22 +0100 in Python • Tagged with PyPi, Python, coding, Textual • 2 min read

Since quickly hacking together textual-query-sandbox a few days back, I've made a bunch of small changes here and there. While most have been cosmetic and playing with some ideas, some have also been internal improvements that should make the tool work better.

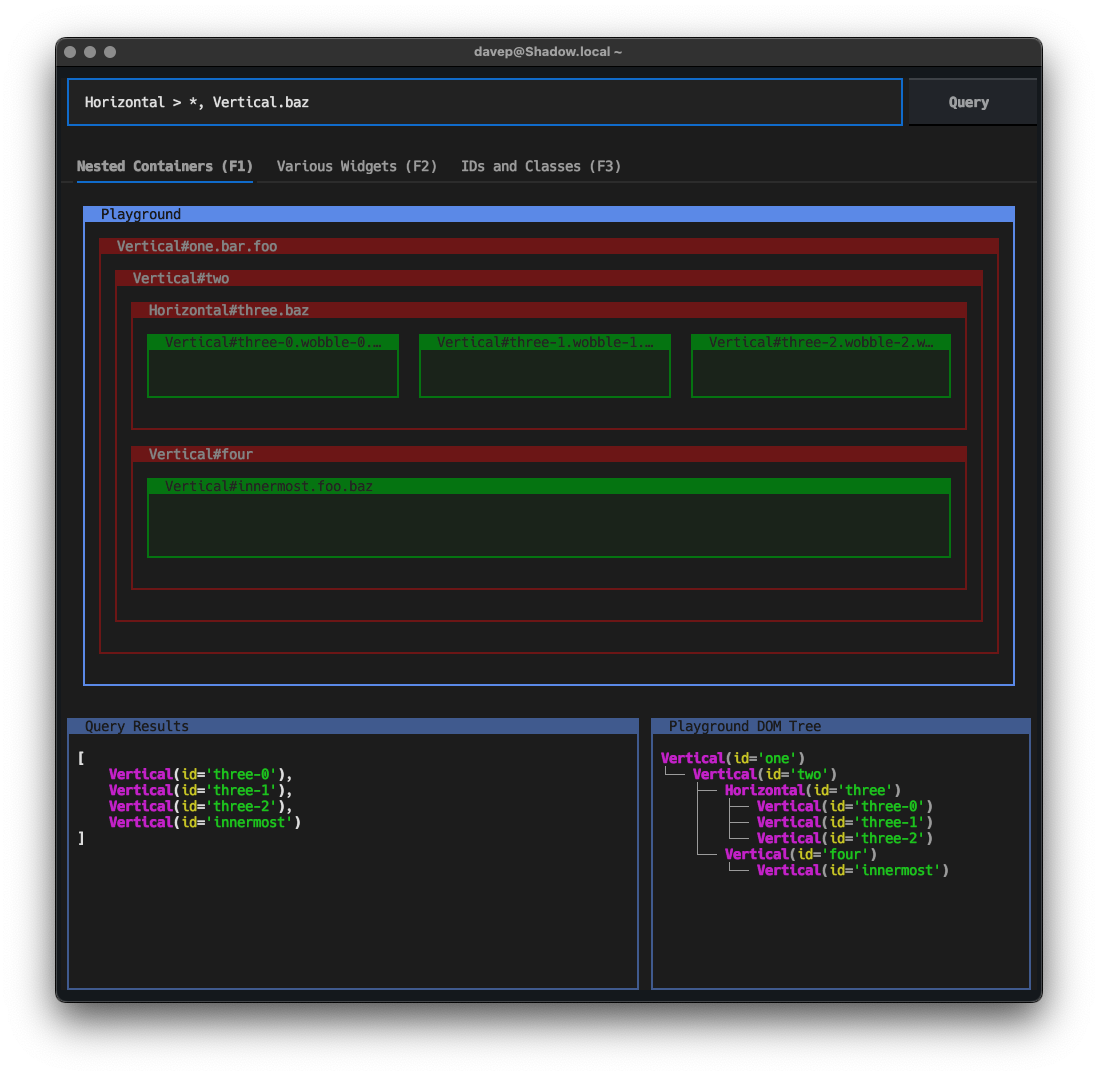
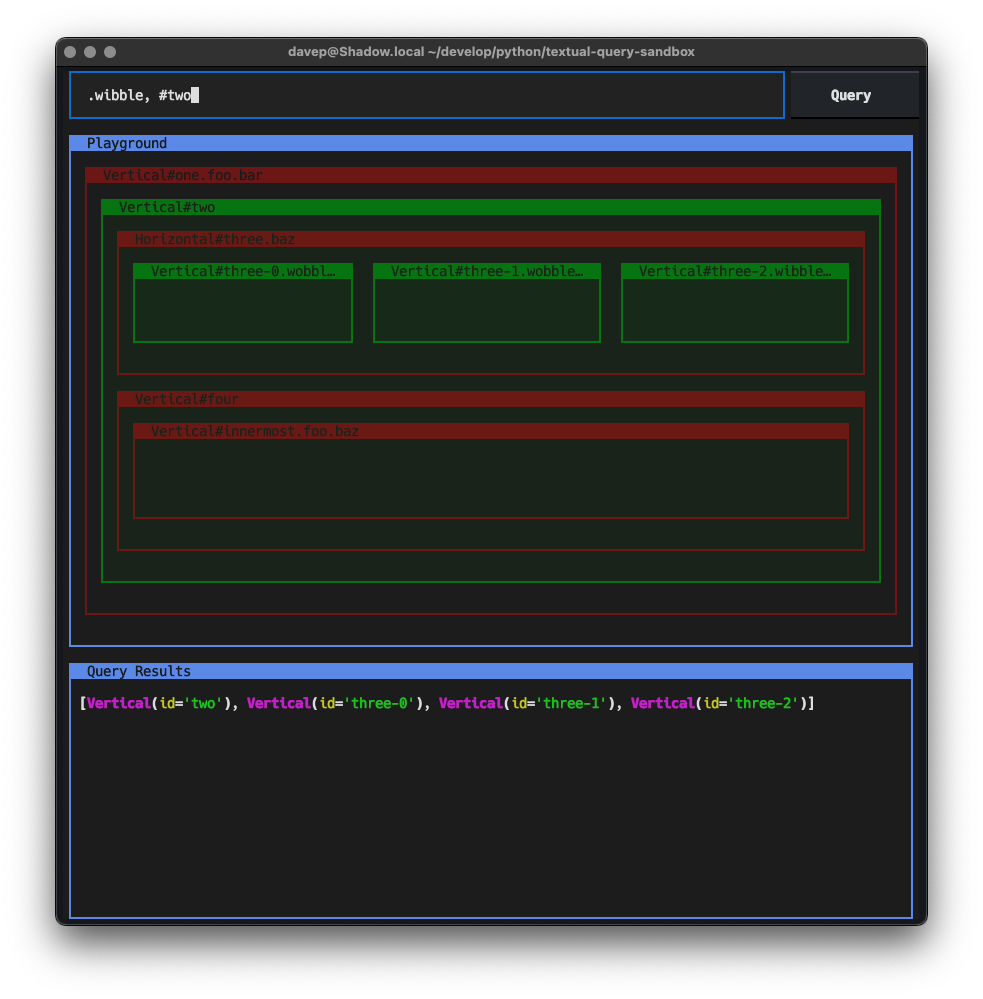
The most prominent change is one I pondered in the previous post, where I thought it might be interesting to have a small collection of playgrounds grounded together with a TabbedContent. So as of now the tool still has the original playground which had an emphasis on nested containers:

Playground 1

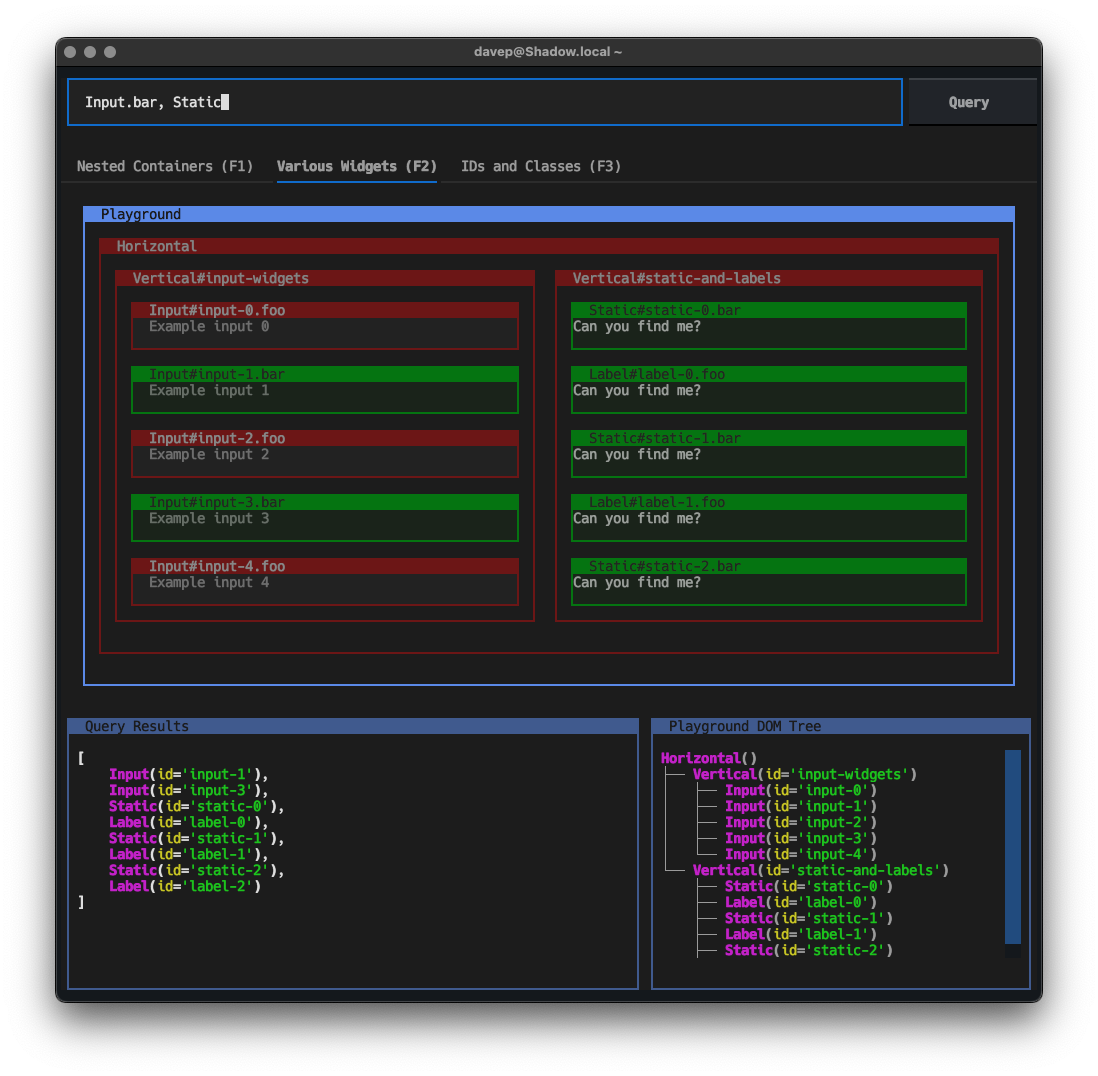
There's now a playground with an emphasis on selecting widgets within containers1:

Playground 2

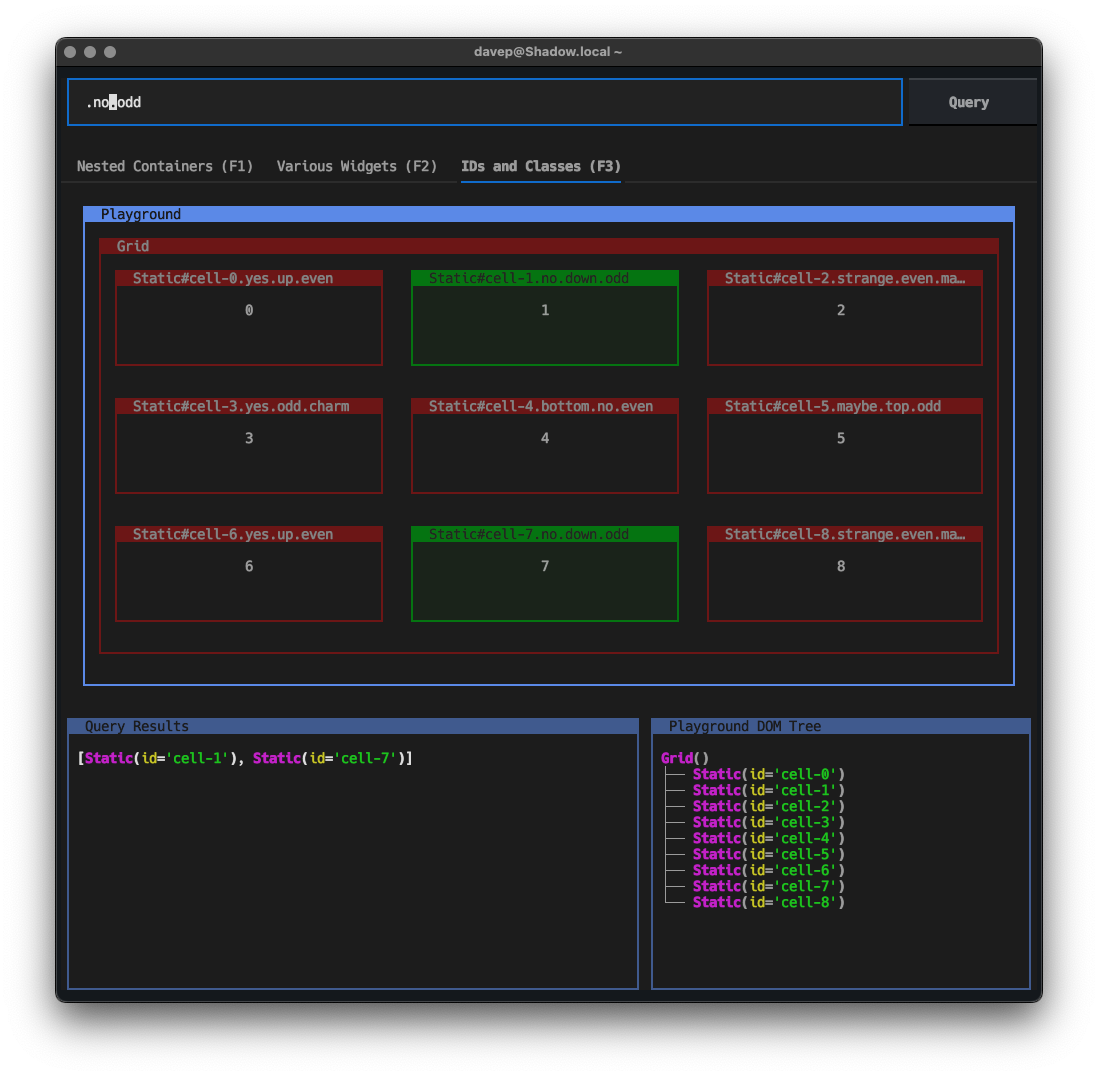
There's also now a playground that has an emphasis on pulling out widgets based on ID and classes:

Playground 3

The other change you will notice from the original post is the DOM tree shown in the bottom right corner. Note that that isn't there to show your query result (that's the bottom left panel), it's there to help picture how the DOM in the current playground hangs together, and will hopefully help in picturing the structure for when you write a query.

I sense there's still a lot of fun things I could add to this, and I'm still keen on the idea of having the playgrounds "soft coded" in some way, so people can make their own and load them up.

Another thing I want to try and work on is making the display as useful as possible. While I think it's actually pretty neat and clear, there's not a lot of space2 available to show the playground and the results. Finding a good balance is an interesting problem.

For a number of reasons this is turning into a really enjoyable tinker project.


  1. This is, of course, slightly nonsensical wording. Containers are widgets in Textual. Pretty much everything you see in your terminal is a widget, even a Screen is a widget. 

  2. A lot of this of course hinges on how big someone's terminal is. I tend to run a fairly high resolutions with the smallest font I find readable so my terminal windows are often pretty "big"; other people tend to have something much smaller in terms of cell with/height. 


Textual Query Sandbox

Posted on 2023-09-01 07:42 +0100 in Python • Tagged with PyPi, Python, coding, Textual • 3 min read

Sometimes I can have an idea for a Textual widget, library or application on my ideas list for weeks, months even, before I get around to it -- mostly just due to not having the clear time to make a run at getting it going -- and then other times an idea can pop into my head and it has to be created there and then. Has to be!

This happened yesterday evening.

While the tool I built is something I'd thought of before (back around November last year I think) it hadn't even made it to my "list of stuff I should make" that I keep in Apple Reminders; not sure why really. But then yesterday evening a question cropped up on the Textual Discord server that related to the subject and I was reminded of it.

The subject being: Textual DOM queries. I like to think that DOM queries in Textual are pretty easy to do, and well-explained in the docs, but it's fair to admit that they need a bit of practice first, just like any powerful tool. So I was reminded that I'd wanted to write a sandbox application, that would have a practice DOM inside it, an input field to type in a query, and a way of displaying the results.

So textual-query-sandbox was born!

Textual Query Sandbox

In this very first version (which was really quickly put together -- it was something like 15 minutes to write the main code and then probably 45 minutes tweaking styles, adding all the admin stuff to allow deployment to PyPi and writing the README) there's an Input, a display of a group of nested containers with different IDs and classes, and then a Pretty widget at the bottom to show the query result.

If you think this looks like it might be useful to you, it can be installed using either pip or (ideally) pipx:

$ pipx install textual-query-sandbox

and then you can run it with:

$ tqs

At which point load up the Textual query docs, type queries into the input field, hit enter and see what gets highlighted and which widgets end up in the result set at the bottom of the screen.

Like I say: this was a quick hack yesterday evening, I think there's a lot more can go into this. For one thing I think a more interesting practice DOM would be a good idea, with a good mix of widgets; another thing could be having a collection of different DOM playgrounds that can be switched between (a TabbedContent of different playgrounds could be fun here); this could even be taken further such that the user can create their own playground DOM to practice against.

Eventually it would be neat if this could be turned into a library that can be included in a Textual application, as a development-time debug tool, so that on-the-fly test queries can be made.

For now though, it's started, it's under way, and I think the current version probably covers 90% of the use cases for something like this; making for a really quick and easy tool to double-check how to query something.


Unbored v0.6.0

Posted on 2023-08-13 21:21 +0100 in Python • Tagged with PyPi, Python, coding, Textual • 2 min read

Late on last year I wrote about a bunch of new things that I'd added to PyPi, things mostly kicked off by an early dog-fooding session we had at textual HQ. Since then I've been slowly doing my best to keep the applications up to date with Textual.

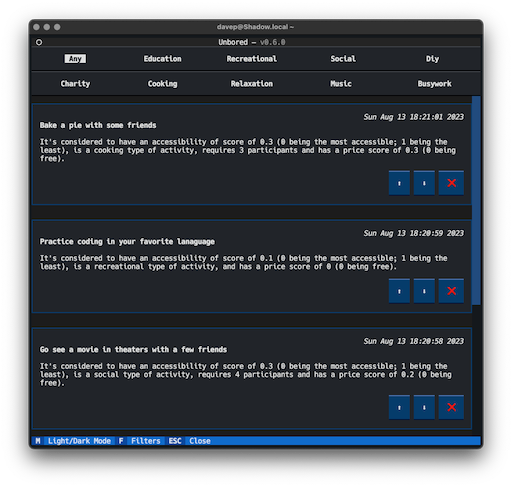
Unbored

As much as possible we try and not make breaking changes with the framework, but at the same time it is still 0.x software and there's still new ways of doing things being designed so there's going to be the odd break in approach now and again.

Unbored, my kind of silly self-populating TODO list application, has been sitting atop Textual 0.20.x for a while now and earlier today I checked how it was getting in with 0.32.0 and... actually surprisingly okay. Not perfect, there were a couple of things that had suffered from bitrot, but it wasn't crashing.

The main thing I needed to change was the ability to focus a couple of containers (they didn't used to receive focus by default, now they do so I had to tell them not to again), and that was about it.

While I was in there I also updated the application so that I dropped the nifty little slide-in error dialog I'd made, and instead embraced the new Textual notification system.

While the application itself is a bit silly, and likely of no real use to anyone, I feel it's a pretty good barometer application, helping me check what the experience is like when it comes to maintaining a Textual application and the needs to keep on top of changes to Textual.

It goes without saying, I hope, that really you should pin the Textual dependency for your applications, and upgrade in a controlled and tested way; for this though it's less crucial and is a good test of the state of the ecosystem, and on the remote chance that anyone is using it, it'll be helpful to me if it does break and they yell.


textual-canvas v0.2.0

Posted on 2023-07-16 09:00 +0100 in Python • Tagged with Python, Textual, coding, PyPi • 1 min read

Demo of textual-canvas

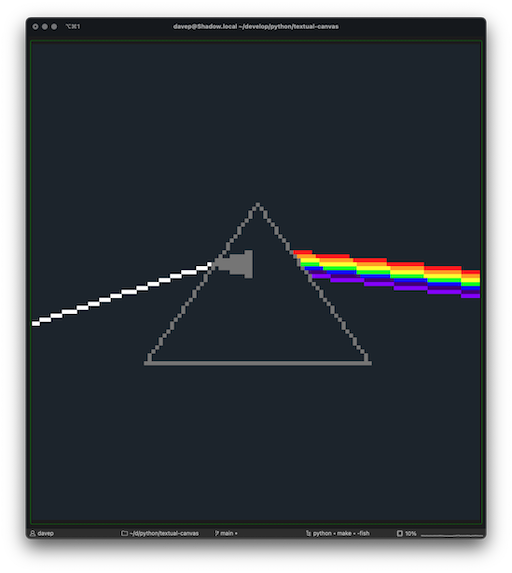
Given that for a good chunk of this year I've been a bit lax about writing here, there's a couple or so coding projects I've not written about (well, not on here anyway -- I have spoken lots about them over on Fosstodon). One such project is textual-canvas.

As the name might suggest, it's a "canvas" for Textual applications, which provides a pretty basic interface for drawing pixels, lines and circles -- and of course any other shape you are able to build up from those basics.

I've just released a quick update after it was requested that I add a clear method to the Canvas widget; a request that makes perfect sense.


The switch has been made

Posted on 2023-07-05 17:56 +0100 in Meta • Tagged with Python, Blogging • 2 min read

Well, it didn't take as long as I expected it to. Just yesterday morning I was giving Pelican a look over as a possible engine for generating my blog, having wanted to move away from Jekyll for a while now. Having tried it and liked what I saw to start with, I wrote about how I liked it and wondered how long it would take me to make the switch.

By the evening I was making a proper effort to get the switchover started, and just a wee while earlier, before writing this post, the switch was made!

The process of making the switch was roughly this (and keep in mind I'm coming from using Jekyll):

  1. Made a branch in the repo to work in.
  2. Removed all of the Jekyll-oriented files.
  3. Decided to set up Pelican and related tools in a virtual environment, managed using pipenv.
  4. Ran pelican-quickstart to kick things off and give me a framework to start with.
  5. Renamed the old _posts directory to content.
  6. Kept tweaking the hell out of the Pelican config file until it started to look "just so" (this is a process that has been ongoing, and doubtless will keep happening for some time to come).
  7. Tried out a few themes and settled on Flex; while not exactly what I wanted, it was close enough to help keep me motivated (while rolling my own theme from scratch would seem fun, I just know it would mean the work would never get done, or at least finished).
  8. Did a mass tidy up of all the tags in all the posts; something I'd never really paid too much attention to as the Jekyll-based blog never actually allowed for following tags.
  9. Went though all the posts and removed double quotes from a lot of the titles in the frontmatter (something Jekyll seems to have stripped, but which Pelican doesn't).
  10. Tweaked the FILE_METADATA to ensure that the slugs for the URLs came from the filenames -- by default Pelican seems to slugify the title of a post and this meant that some of the URLs were changing.

All in all I probably spent 6 or 7 hours on making the move; a lot of that involving reading up on how to configure Pelican and researching themes. The rest of it was a lot of repetitive work to fix or tidy things.

The most important aspect of this was keeping the post URLs the same all the way back to the first post; as best as I can tell I've managed that.

So far I'm pleased with the result. I'm going to live with the look/theme for a wee while and see how it sits for me. I'm sure I'll tweak it a bit as time goes on, but at the moment I'm comfortable with how it looks.


Considering Pelican

Posted on 2023-07-04 08:32 +0100 in Meta • Tagged with Python, Blogging • 3 min read

Since getting my blog editing environment set up on the "new" machine a couple of days back I've been thinking some more about moving away from Jekyll. Jekyll itself has served me well since I started this blog back in 2015, but I was reminded again when installing it on the Mac Mini that it's Ruby-based and I have very little understanding of how to get a good Ruby experience on macOS1.

Having mentioned on Mastodon that I was thinking about finally looking at moving my blog management/generation to something new, and specifically something Python-based and ideally some sort of site generator, I got a few suggestions.

One that looks promising so far is Pelican. At first glance it seems to tick a few boxes for me:

  • Python-based (so easy for me to grok in terms of installing, and also more chance of being hackable).
  • Uses Markdown (curiously as an alternative, to reStructuredText, which looks to be the default).
  • Does article-based stuff as well as page-based stuff.
  • Lots of themes, and themes are Jinja2-based (I'm pretty familiar with Jinja thanks to my Django days and also using the library when kicking off ng2web).
  • RSS feed generation.
  • Syntax-highlighted code blocks.

While I'm not quite ready to dive in and make the move just yet (I am on a "muck about at home" holiday this week, but I've got enough planned without losing a day to rebooting my blog), I did do a quick experiment to see if Pelican would work for me.

Key to this is can I keep the URLs for all the posts the same? If I can't that's a non-starter.

Things got off to a good start with an easy install:

$ pipx install "pelican[markdown]"

I then used the pelican-quickstart to kick off a test site, copied in my existing Markdown files, dived into the docs and found how to configure the generated URLs and... yeah, within like 10 minutes I had a very rough version of my blog up and going.

It looked like garbage, the theme really wasn't to my taste at all, but the core of the blog was working.

I've nuked it all for now but a more considered evaluation is now on my TODO list. Things I'll need to drive into properly are:

  • Find a base theme that's to my taste.
  • Get Disqus working it so that any old comments remain in place.
  • Get my image/attachment layout back in place.
  • Go through and tidy up all the tagging (which has been a mess with this blog because I never did get round to getting Jekyll to actually use tags).
  • Figure out the best way to do the publishing to GitHub pages.
  • Likely a bunch of other stuff I've not thought about yet.

But, yeah, for a brief "over first coffee of the day" tinker to see if I like it... I like!

Let's see how long it takes me to actually get around to making the switch. ;-)


  1. When setting this up a couple of days back, I had to pin some packages for the blog to older versions because of Ruby version issues; I'm sure that Ruby has virtual environment solutions akin to Python, but diving into that just for one tool... nah. 


A new GitHub profile README

Posted on 2023-07-03 08:15 +0100 in Coding • Tagged with GitHub, Python, Textual • 2 min read

My new GitHub banner

Ever since GitHub introduced the profile README1 I've had a massively low-effort one in place. I made the repo, quickly wrote the file, and then sort of forgot about it. Well, I didn't so much forget as just keep looking at it and thinking "I should do something better with that one day".

Thing is, while there are lots of fancy approaches out there, and lots of neat generator tools and the like... they just weren't for me.

Then yesterday, over my second morning coffee, after getting my blog environment up and going again, I had an idea. It could be cool to use Textual's screenshot facility to make something terminal-themed! I mean, while it's not all I am these days, so much of what I'm doing right now is aimed at the terminal.

So... what to do? Then I thought it could be cool to knock up some sort of login screen type thing; with a banner. One visit to an online large terminal text generator site later, I had some banner text. All that was left was to write a simple Textual application to create the "screen".

The main layout is simple enough:

def compose(self) -> ComposeResult:
    yield Label(NAME, classes="banner")
    yield Label(PRATTLE)
    yield Label("github.com/davep login: [reverse] [/]")

where NAME contains the banner and PRATTLE contains the "login message". With some Textual CSS sprinkled over it to give the exact layout and colour I wanted, all that was left was to make the snapshot. This was easy enough too.

While the whole thing isn't fully documented just yet, Textual does have a great tool for automatically running an application and interacting with it; that meant I could easily write a function to load up my app and save the screenshot:

async def make_banner() -> None:
    async with GitHubBannerApp().run_test() as pilot:
        pilot.app.save_screenshot("davep.svg")

Of course, that needs running async, but that's simple enough:

if __name__ == "__main__":
    asyncio.run(make_banner())

Throw in a Makefile so I don't forget what I'm supposed to run:

.PHONY: all
all:
    pipenv run python make_banner.py

and that's it! Job done!

From here onward I guess I could have some real fun with this. It would be simple enough I guess to modify the code so that it changes what's displayed over time; perhaps show a "last login" value that relates to recently activity or something; any number of things; and then run it in a cron job and update the repository.

For now though... I'll stick with keeping things nice and simple.


  1. It was actually kind of annoying when they introduced it because the repo it uses is named after your user name. I already had a davep repo: it was a private repo where I was slowly working on a (now abandoned, I'll start it again some day I'm sure) ground-up rewrite of my davep.org website. 


OIDIA

Posted on 2022-12-16 09:30 +0000 in Python • Tagged with Python, coding, Textual, PyPi • 2 min read

Another little thing that's up on PyPi now, which is the final bit of fallout from the Textual dogfooding sessions, is a little project I'm calling OIDIA.

The application is a streak tracker. I'm quite the fan of streak trackers. I've used a few over the years, both to help keep me motivated and honest, and also to help me track that I've avoided unhelpful things too. Now, most of the apps I've used, and use now, tend to have reminders and counts and stats and are all about "DO NOT BREAK THE STREAK OR ELSE" and that's mostly fine, but...

To keep things simple and to purely concentrate on how to build Textual apps, I made this a "non-judgement" streak tracker. It's designed to be really simple: you add a streak, you bump up/down the number of times you did (or didn't do) the thing related to that streak, for each day, and that's it.

No totals. No stats. No reminders and bugging. No judgement.

Here it is in action:

When I started it, I wasn't quite sure how I wanted to store the data. Throwing it in a SQLite database held some appeal, but that also felt like a lot of faff for something so simple. Also, I wanted to make the data as easy to get at, to use elsewhere, and to hack on, as possible. So in the end I went with a simple JSON file.

On macOS and GNU/Linux streaks.json lives in ~/.local/share/oidia, on Windows it'll be in... I'm not sure off the top of my head actually; it'll be in whatever directory the handy xdg library has chosen. and because it's JSON that means that something like this:

OIDIA in action

ends up looking like this:

[
    {
        "title": "Hack some Python",
        "days": {
            "2022-12-02": 1,
            "2022-12-03": 1,
            "2022-12-04": 1,
            "2022-12-05": 1,
            "2022-12-06": 1,
            "2022-12-07": 1,
            "2022-12-08": 1,
            "2022-12-01": 1,
            "2022-11-30": 1,
            "2022-11-29": 1,
            "2022-11-28": 1
        }
    },
    {
        "title": "Brush my teeth",
        "days": {
            "2022-12-02": 2,
            "2022-12-03": 2,
            "2022-12-04": 2,
            "2022-12-05": 2,
            "2022-12-06": 2,
            "2022-12-07": 2,
            "2022-12-08": 1,
            "2022-12-01": 2,
            "2022-11-30": 2,
            "2022-11-29": 2,
            "2022-11-28": 2
        }
    },
    {
        "title": "Walk",
        "days": {
            "2022-12-02": 1,
            "2022-12-03": 1,
            "2022-12-04": 1,
            "2022-12-05": 1,
            "2022-12-06": 1,
            "2022-12-07": 1,
            "2022-12-08": 1,
            "2022-12-01": 1,
            "2022-11-30": 1,
            "2022-11-29": 1,
            "2022-11-28": 1
        }
    },
    {
        "title": "Run 5k",
        "days": {
            "2022-12-03": 2,
            "2022-12-05": 1,
            "2022-11-30": 1,
            "2022-11-28": 2
        }
    },
    {
        "title": "Run 10k",
        "days": {
            "2022-12-03": 1,
            "2022-11-28": 1
        }
    }
]

Of course, it remains to be seen how well that actually scales; possibly not so well over a long period of time, but this was written more as another way to explore Textual than anything else. Even then, it would be pretty trivial to update to something better for holding the data.

If this seems like your thing (and I will be supporting it and onward developing it) you can find it over on PyPi, which means it can be installed with pip or the ever-handy pipx:

$ pipx install oidia

New Things On PyPi

Posted on 2022-12-01 22:13 +0000 in Python • Tagged with Python, coding, Textual, PyPi • 4 min read

An update

So, it's fast approaching 2 months now since I started the new thing and it's been a busy time. I've had to adjust to a quite a few new things, not least of which has been a longer and more involved commute. I'm actually mostly enjoying it too. While having to contend with busses isn't the best thing to be doing with my day, I do have a very fond spot for Edinburgh and it's nice to be in there most days of the week.

Part of the fallout from the new job has been that, in the last couple of weeks, I've thrown some more stuff up on PyPi. This comes about as part of a bit of a dog-fooding campaign we're on at the moment (you can read some background to this over on the company blog). While they have been, and will continue to be, mentioned on the Textualize blog, I thought I'd give a brief mention of them here on my own blog too given they are, essentially, personal projects.

gridinfo

This is one I'd like to tweak some more and improve on if possible. It is, in essence, a Python-coded terminal tool that does more or less the same as slstats.el. It started out as a rather silly quick hack, designed to do something different with rich-pixels.

Here's the finished version (as of the time of writing) being put through its paces:

Download from here, or install and play with it with a quick pipx install gridinfo.

unbored

The next experiment with Textual was to write a terminal-based client for the Bored-API. My initial plan for this was to just have a button or two that the user could mash on and they'd get an activity suggestion dropped into the middle of the terminal; but really that seemed a bit boring. Then I realised that it'd be a bit more silly and a bit more fun if I did it as a sort of TODO app. Bored? Run it up and use one of the activities you'd generated before. Don't like any of them? Ignore them and generate some more! Feeling bad that you've got such a backlog of reasons to not be bored? Delete a bunch!

And so on.

Here's a short video of it in action:

Download from here, or install and play with it with a quick pipx install unbored.

textual-qrcode

This one... this one I'm going to blame on the brain fog that followed flu and Covid jabs that happened the day before (and which are still kicking my arse 4 days later). Monday morning, at my desk, and I'm wondering what to next write to experiment with Textual, and I realised it would be interesting to write something that would show off that it's easy to make a third party widget library.

And... yeah, I don't know why, but I remembered qrencode.el and so textual-qrcode was born!

The most useless Textal widget yet

I think the most amusing part about this is that I did it in full knowledge that it would be useless; the idea being it would be a daft way of showing off how you could build a widget library as an add-on for Textual. But... more than one person actually ended up saying "yeah hold up there this could actually be handy!"

If you're one of those people... you'll find it here.

FivePyFive

While I was on a roll putting stuff up on PyPi, I also decided to tweak up my Textual-based 5x5 and throw that up too. This was my first app built with Textual, initially written before I'd even spoken to Will about the position here. At one point I even did a version in Lisp.

It's since gone on to become one of the example apps in Textual itself but I felt it deserved being made available to the world via an easy(ish) install. So, if you fancy trying to crack the puzzle in your terminal, just do a quick:

$ pipx install fivepyfive

and click away.

You can find it over here.

PISpy

Finally... for this week anyway, is a tool I've called PISpy. It's designed as a simple terminal client for looking up package information on PyPi. As of right now it's pretty straightforward, but I'd like to add more to it over time. Here's an example of it in action:

One small wrinkle with publishing it to PyPi was the fact that, once I'd chosen the name, I checked that it hadn't been used on PyPi (it hadn't) but when it came to publishing the package it got rejected because the name was too similar to another package! I don't know which, it wouldn't say, but that was a problem. So in the end the published name ended up having to be slightly different from the actual tool's name.

See over here for the package, and you can install it with a:

$ pipx install pispy-client

and then just run pispy in the terminal.

Conclusion

It's been a fun couple of weeks coming up with stuff to help exercise Textual, and there's more to come. Personally I've found the process really helpful in that it's help me learn more about the framework and also figure out my own approach to working with it. Each thing I've built so far has been a small step in evolution on from what I did in the previous thing. I doubt I've arrived at a plateau of understanding just yet.


Python and macOS

Posted on 2022-11-05 08:49 +0000 in Python • Tagged with Python, macOS, coding • 5 min read

Introduction

On Twitter, a few weeks back, @itsBexli asked me how I go about setting up Python for development on macOS. It's a great question and one that seems to crop up in various places, and since I first got into using macOS and then subsequently got back into coding lots in Python it's absolutely an issue I ran into.

With my previous employer, while I was the only developer, I wasn't the only person writing code and more than one other person had this issue so I eventually wrote up my approach to solving this problem. That document is on their internal GitLab, but I thought it worth me writing my personal macOS/Python "rules" up again, just in case they're useful to anyone else.

I am, of course, not the first person to tackle this, to document this, to write down a good approach to this. Before and after I settled on my approach I'd seen other people write about this. So... this post isn't here to try and replace those, it's simply to write down my own approach, so if anyone asks again I can point them here. I feel it's important to stress: this isn't the only way or thoughts on this issue, there are lots of others. Do go read them too and then settle on an approach that works for you.

One other point to note, which may or may not make a difference (and may or may not affect how this changes with time): for the past few years I've been a heavy user of pipenv to manage my virtual environments. This is very likely to change from now on, but keep in mind that what follows was arrived at from the perspective of a pipenv user.

So... with that admin aside...

The Problem

When I first got back into writing Python it was on macOS and, really early on, I ran into all the usual issues: virtual environments breaking because they were based on the system Python and it got updated, virtual environments based on the Homebrew-installed Python and it got updated, etc... Simply put, an occasional, annoying, non-show-stopping breaking of my development environment which would distract me when I'd sat down to just hack on some code, not do system admin!

My Solution

For me, what's worked for me without a problem over the past few years, in short, is this:

  1. NEVER use the system version of Python. Just don't.
  2. NEVER use the Homebrew's own version of Python (I'm not even sure this is an issue any more; but it used to be).
  3. NEVER use a version of Python installed with Homebrew (or, more to the point, never install Python with Homebrew).
  4. Manage everything with pyenv; which I do install from Homebrew.

The Detail

As mentioned earlier, what I'm writing here assumes that virtual environments are being managed with pipenv (something I still do for personal projects, for now, but this may change soon). Your choices and mileage may vary, etc... This is what works well for me.

The "one time" items

These are the items that need initially installing into a new macOS machine:

Homebrew

Unless it comes from the Mac App Store, I try and install everything via Homebrew. It's really handy for keeping track of what I've got installed, for recreating a development environment in general, and for keeping things up to date.

pyenv

With Homebrew installed the next step for me is to install pyenv. Doing so is as easy as:

$ brew install pyenv

Once installed, if it's not done it for you, you may need to make some changes to your login profile. I'm a user of fish so I have these lines in my setup. Simply put: it asks pyenv to set up my environment so my calls to Python go via its setup.

Plenty of help on how to set up pyenv can be found in its README.

Once I've done this I tend to go on and install the Python versions I'm likely to need. For me this tends to be the most recent "active" stable versions (as of the time of writing, 3.7 through 3.10; although I need to now start throwing 3.11 into the mix too).

I use this command:

$ pyenv install --list

to see the available versions. If I want to see what's available for a specific version I'll pipe through grep:

$ pyenv install --list | fgrep "  3.9"

This is handy if I want to check what the very latest release of a specific version of Python is.

The "Global" Python

When I'm done with the above I then tend to use pyenv to set my "global" Python. This is the version I want to get when I run python and I'm not inside a virtual environment. Doing that is as simple as:

$ pyenv global 3.10.7

Of course, you'd swap the version for whatever works for you.

When Stuff Breaks

It seems more rare these days, but on occasion I've had it such that some update somewhere still causes my environment to break. Now though I find that all it takes is a quick:

$ pyenv rehash

and everything is good again.

Setting Up A Repo

With all of the stuff above being mostly a one-off (or at least something I do once when I set up a new machine -- which isn't often), the real "work" here is when I set up a fresh repository when I start a new project. Really it's no work at all. Again, as I've said before, I've tended to use pipenv for my own work, and still do for personal stuff (but do want to change that), mileage may vary here depending on tool.

When I start a new project I think about which Python version I want to be working with, I ensure I have the latest version of it installed with pyenv, and then ask pipenv to create a new virtual environment with that:

$ pipenv --python 3.10.7

When you do this, you should see pipenv pulling the version of Python from the pyenv directories:

$ pipenv --python 3.10.7
Creating a virtualenv for this project...
Pipfile: /Users/davep/temp/cool-project/Pipfile
Using /Users/davep/.pyenv/versions/3.10.7/bin/python3 (3.10.7) to create virtualenv...
⠙ Creating virtual environment...created virtual environment CPython3.10.7.final.0-64 in 795ms
  creator CPython3Posix(dest=/Users/davep/temp/cool-project/.venv, clear=False, no_vcs_ignore=False, global=False)
  seeder FromAppData(download=False, pip=bundle, setuptools=bundle, wheel=bundle, via=copy, app_data_dir=/Users/davep/Library/Application Support/virtualenv)
    added seed packages: pip==22.2.2, setuptools==65.3.0, wheel==0.37.1
  activators BashActivator,CShellActivator,FishActivator,NushellActivator,PowerShellActivator,PythonActivator
✔ Successfully created virtual environment!
Virtualenv location: /Users/davep/temp/cool-project/.venv
Creating a Pipfile for this project...

The key thing here is seeing that pipenv is pulling Python from ~/.pyenv/versions/. If it isn't there's a good chance you have a Python earlier in your PATH than the pyenv one -- something you generally don't want. It will work, but it's more likely to break at some point in the future. That's the key thing I look for; if I see that I know things are going to be okay.

Conclusion

Since I adopted these personal rules and approaches (and really, calling them "rules" is kind of grand -- there's almost nothing to this) I've found I've had near-zero issues with the stability of my Python virtual environments (and what issues I have run into tend to be trivial and of my own doing).

As I said at the start: there are, of course, other approaches to this, but this is mine and works well for me. Do feel free to comment with your own, I'm always happy to learn about new ways!